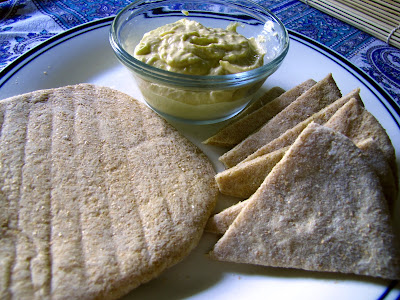
Just good, basic hummus, though I am a fan of adding flavors like Roasted Red Pepper and Spicy Spinach, sometimes it's nice just to whip up a batch of plain hummus.
1 can garbanzo beans
1/2 juice from said can of garbanzo beans
1 clove garlic, crushed
1/3 cup tahini
1/8 tsp kosher salt
a few Tbsp lemon juice
a few Tbsp olive oil
a splash of juice from a jar of jalepenos
a few jalepenos, diced
a dash of good paprika
a dash of cayenne pepper
Adjust lemon juice and olive oil to get the consistency you want, and add more tahini for flavor as needed.
Excellent with pita bread
Monday, April 9, 2012
Sunday, April 8, 2012
Artisan Bread in Five Minutes a Day

Is that beautiful or what?!
While finding recipes online, I kept coming across references to a book called "Artisan Bread in Five Minutes a Day" - an amazingly simple, no-knead way to make awesome bread with hardly any effort.
I checked the book out from the library, and quickly found a few dozen recipes I wanted to try. This is one of the few cookbooks I might actually buy!
The few times I have made their basic "Master Recipe" it has turned out AWESOME. I can hardly wait for the bread to cool off before slicing off a piece and eating it right then and there in the kitchen.
Look forward to many more posts as I try different recipes from "Artisan Bread in 5 Minutes a Day" including rye and sandwich white.


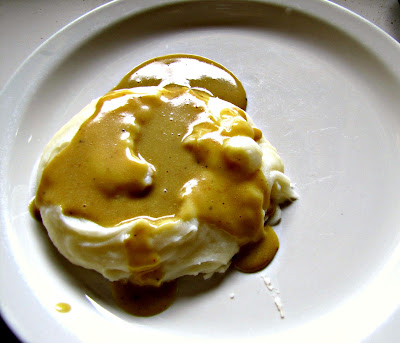
Golden Gravy (the hippy kind!)
Everyone should have a good gravy recipe.
The recipe I'm sticking with is my current 2nd favorite recipe from the New Farm Vegetarian Cookbook
You can view the lovely recipe here on someone's flickr page. I love the drawings and illustrations in this cookbook.
This recipe is EASY, and uses ingredients you "should" have in your kitchen at all times anyway.
Toast the flour, stir in nutritional yeast, then oil. Cook until bubbly, then add water, whisking until it thickens and bubbles. Add soy sauce (or Bragg's liquid aminos) and salt and pepper to taste.
In Joy!
Eggs in a Nest - Two Ways
I can't tell you how many times in the last 6 months I have made eggs and toast because that was pretty much all I had to work with. Eggs, hash browns and toast are one of my go-to poverty breakfasts. Always with aching necessity have I prepared eggs and toast, and therefore resent them as much as I resent Spanish Rice Casserole, meals that describe hungry times.
But this morning, to commemorate the end of a forced month of frugality, I turned shame into pride and made some really cool eggs in toast and hash browns:
Eggs in a Nest - in the bread!
 I'll let you head over to Pinch my Salt for the 'recipe' but basically you just cut a hole in a slice of bread, butter it, crack an egg in it, and when it's mostly set, flip it over and finish cooking it.
The thicker the bread, the smaller the hole needs to be. I used an old spaghetti sauce jar. I toasted the 'holes' too so I could put it back on top as a surprise door since I wouldn't let Anthony see what I was making for him.
When I flipped the bread, the egg from the uncooked side spilled out, but that was okay because I served them first side up so they looked great!
If you're going to make toast and eggs, you might as well just put them together like this!!
Eggs in a Nest - a hash brown nest!
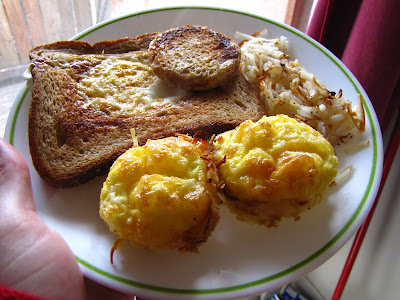
This recipe I found on "How I Learned to Stop Worrying and Love Swiss Chard" holds a lot of promise, and I will definitely make these again, but maybe I'll have to buy a larger muffin tin instead of a cupcake pan. All my "nest" (hashbrowns" stuck to the pan so I just had delicious puffy cupped eggs but no nest.
Friday, April 6, 2012
Beer Battered Asparaugs Spears
On Friday, I went to a party at my sister- and brother-in-laws house. Brother works in Portland 4 days a week and had slept for 14 hours before waking up for his birthday party. Sister had been in Portland the whole week taking care of her mother who had been recently hospitalized.
My partner and I were the first to arrive after school and work, so we offered to help prepare. Anthony helped with man-stuff like yard work, and I was authorized command of the kitchen. I was shown the available foods to work with, which included two bunches of asparagus.
As luck would have it, I had THE BEST COOKBOOK I'VE EVER READ with me. I had been reading "the Locavoere's Kitchen: A Cook's Guide to Seasonal Eating and Preserving" by Marilou K. Suszko. A preview can be found here on google books, but I highly recommend immediately purchasing this book or getting it at a library, like I did, NOW! I rarely read cookbooks cover to cover, but this one was like a suspense novel - I could not put it down! Most of the recipes are simple enough for even a novice to master, using ingredients you *should* have in your well-stocked cooking kitchen.
I made the two asparagus recipes that were the simplest, and most suited to a birthday cookout menu - Beer Battered Asparagus Spears and Crunchy Asparagus Spears. Sadly, no pictures were taken, as if there would have been time to photograph these delightful foods - as the book predicted, the asparagus disappeared as soon as it was ready.
So I'll have to go to the Farmer's Market this weekend, make them again so I can show you some pictures, if you can't tell from the recipe on google books how good these are going to be!!!
Beer Battered Asparagus Spears
from the Locavore's Kitchen, by Marilou K. Suszko
2 pounds fresh asparagus, washed, dried, tough ends trimmed
1 ½ cups all-purpose flour
1 ½ tsp garlic powder
1 tsp kosher salt (or ½ tsp table salt)
1 tsp freshly ground black pepper
12 oz beer (1 ½ cups) – I used a room temperature Pabst
Canola or vegetable oil for frying
In a shallow baking dish, combine the flour and the seasonings. Slowly stir in the beer until the batter is smooth and thick enough to cling to the asparagus (using all of the beer may not be necessary)
Heat ½ - 1 inch of oil in a large frying pan over medium-high heat. Dredge the asparagus through the batter, coating each stalk completely. Fry in the hot oil until golden and puffy, about 4 minutes, turning once. If the spears are browning too quickly, reduce heat a little.
Drain the spears on a paper towel-lined tray before serving
Side-bar notes:
“This is one of those recipes that disappear almost as fast as they come out of the pan. Use thicker spears of fresh homegrown asparagus, tender to begin with. A quick bath in the hot oil makes them almost melt in your mouth…and using beer from a local microbrewery keeps it all in the local family.”
“How do you know if the oil is hot enough? Place a drop of batter in the oil, if it sizzles immediately, it’s ready. Too hot? The oil smokes.”
Megan’s note:
I only use safflower or sunflower oil for frying. Canola oil is most likely made from genetically modified ingredients, as is soybean vegetable oil – both canola and regular “vegetable” oil have low smoking temperatures. When oil smokes it releases free radicals which are harmful to the body. Using an oil with a high smoking temp such as safflower or sunflower ensures a non-smoky oil for frying.
Crunchy Asparagus Spears
Another brilliant recipe from 'the Locavore's Kitchen' by Marilou K. Suszko. If you haven't bought or checked out this cookbook yet, please do!!!! A preview is available on google books.
Crunchy Asparagus Spears
from the Locavore’s Kitchen – Marilou K. Suszko
¼ cup mayonnaise (or veganaise)
2 Tbsp Dijon mustard
1 tsp lemon juice
½ tsp coarse salt
¼ tsp freshly ground black pepper
1 cup panko bread crumbs
2 Tbsp extra virgin olive oil, divided
1 pound fresh thick asparagus, though ends trimmed
Preheat oven to 450
Whisk together mayonnaise, mustard, lemon juice, salt and pepper in a shallow baking dish, wide enough to dip the spears in the mixture
Spread the breadcrumbs on a rimmed baking sheet. Oil another rimmed baking sheet with 1 Tbsp oil
Roll each stalk of asparagus in the mayonnaise mixture. Roll in the breadcrumbs until coated
Transfer to the oiled baking sheet. Sprinkle with remaining olive oil
Roast 13-15 minutes, until the crumbs are golden and the asparagus is crisp-tender
Serve immediately
Side-bar notes: “Contrary to what you may have heard in the past, thick spears are better than thin, and freshly picked trump them both! Rolled in panko, a very crunchy Japanese breadcrumb, these spears make a nice side dish or can be served as an appetizer with a mustard dipping sauce. Simply mix the mustard of your choice with some crème fraiche or sour cream thinned with a little milk. Learn to make your own crème fraiche on page 50”
“A suitable substitute for the panko crumbs would be fresh breadcrumbs, lightly toasted. To make the crunchiest possible breadcrumbs, remove the crusts from a slices of bread and process into coarse crumbs in a food processor fitted with the steel blade. Spread on a baking sheet and place in a 400 degree oven until dry and lightly toasted. Make extra and store in a sealed container for future use”
Sunday, April 1, 2012
Pita Bread via bread machine
If you don't have a bread machine, please get one! Mine was a surprise gift when my partner went to a moving sale to buy an awesome rug. I use it at least once a week, sometimes more.
If you want to find a non-bread machine pita bread, click here to view Food Blog Search results and pick a recipe that looks good!
Bread Machine Pita Bread
adapted from the Happy Housewife
3 1/2 cups flour (I use about 1/2 whole wheat and 1/2 unbleached white)
1 1/2 tsp kosher salt
1 Tbsp honey*
2 tsp yeast
1 1/4 cups water
2 Tbsp olive oil**
Add the ingredients to the bread machine according to instructions - mine is liquids first, then flour, then yeast.
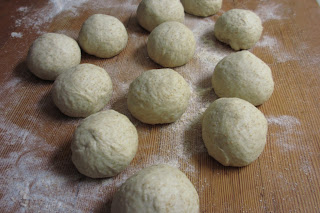
When dough is finished, plop onto a floured surface and divide into 8-12 pieces. When I did 8 they were very soft and awesome, and when I made 12, they were still soft and awesome.
Roll into balls and let rest under a damp towel for 20 minutes.
 Preheat the oven to 400, with a baking stone or cookie sheet in the oven.
Place the pitas on the baking sheet or stone and bake for 3-5 minutes, depending on your oven.
Mine have puffed up both times I made them, but I haven't gotten a fully functional pita pocket yet, so I have just used the pita as a pull-apart flat bread for hummus***, which is my favorite way to eat it.
*Please buy local honey - the more commercially produced your honey is, the more likely it is to not actually be honey. Also, honey that you get from a local farmer supports a system of agriculture that sustains life - Bee Colony Collapse Disorder is caused by pesticides from industrial farming, so please make sure your honey comes from a local farm - the bees and the future human race will thank you for their continued existence. Our fates are linked - without bees, we wouldn't have much to eat.
Also, honey is awesome. I learned from Carl Sagan in Cosmos that honey never spoils. People have found honey in 2,000 year old tombs and eaten it.
**Yes, it has to be olive oil, no you may NOT use any other kind of oil. :)
***Mmm...hummus! Here are my recipes for flavored hummus - Roasted Red Pepper, and Spicy Spinach.
Update: April 11, 2012 - Frozen Pita Dough
When I made the pita for this post, I froze half of the dough balls after shaping. Two days later, I took them out, and thawed them on the counter (forgot to time it, but it seemed like it took about 40 minutes). When they felt not-frozen anymore I rolled them out and baked as usual. They weren't as awesome as the fresh batch, but more than edible, especially with hummus! From now on, I will probably make a double batch of pita dough and freeze so I can have fresh pita's quickly and easily whenever I need them.
If you want to find a non-bread machine pita bread, click here to view Food Blog Search results and pick a recipe that looks good!

Bread Machine Pita Bread
adapted from the Happy Housewife
3 1/2 cups flour (I use about 1/2 whole wheat and 1/2 unbleached white)
1 1/2 tsp kosher salt
1 Tbsp honey*
2 tsp yeast
1 1/4 cups water
2 Tbsp olive oil**
Add the ingredients to the bread machine according to instructions - mine is liquids first, then flour, then yeast.
When dough is finished, plop onto a floured surface and divide into 8-12 pieces. When I did 8 they were very soft and awesome, and when I made 12, they were still soft and awesome.
Roll into balls and let rest under a damp towel for 20 minutes.

 Preheat the oven to 400, with a baking stone or cookie sheet in the oven.
Place the pitas on the baking sheet or stone and bake for 3-5 minutes, depending on your oven.
Mine have puffed up both times I made them, but I haven't gotten a fully functional pita pocket yet, so I have just used the pita as a pull-apart flat bread for hummus***, which is my favorite way to eat it.
*Please buy local honey - the more commercially produced your honey is, the more likely it is to not actually be honey. Also, honey that you get from a local farmer supports a system of agriculture that sustains life - Bee Colony Collapse Disorder is caused by pesticides from industrial farming, so please make sure your honey comes from a local farm - the bees and the future human race will thank you for their continued existence. Our fates are linked - without bees, we wouldn't have much to eat.
Also, honey is awesome. I learned from Carl Sagan in Cosmos that honey never spoils. People have found honey in 2,000 year old tombs and eaten it.
**Yes, it has to be olive oil, no you may NOT use any other kind of oil. :)
***Mmm...hummus! Here are my recipes for flavored hummus - Roasted Red Pepper, and Spicy Spinach.
Update: April 11, 2012 - Frozen Pita Dough
When I made the pita for this post, I froze half of the dough balls after shaping. Two days later, I took them out, and thawed them on the counter (forgot to time it, but it seemed like it took about 40 minutes). When they felt not-frozen anymore I rolled them out and baked as usual. They weren't as awesome as the fresh batch, but more than edible, especially with hummus! From now on, I will probably make a double batch of pita dough and freeze so I can have fresh pita's quickly and easily whenever I need them.
Subscribe to:
Posts (Atom)