Tuesday, October 25, 2011

Easy Peanut Red Curry (with fractals!)

Another "I don't even know if I can call this a recipe and I feel like a cheat for posting it because all I really do is just mix a few things together" kind of recipe.
 My favorite easy awesome dinner.  I can cook this after a 13+ hour work day.  My favorite meal to make when I think I'm on the verge of succumbing to a cold or flu.  My favorite meal to have when I have a cold or flu.  One of my favorite meals to eat when it's been cold, dark and rainy for 1 month, 2 months, 3 months, 4 months, 5 months, 6 months.  Yay, Oregon.  My favorite thing to do with bell peppers (besides stuff them).  ("Stuff them" is going to be a hyperlink to a recipe someday!)


The sauce in this recipe is an increasingly good imitation of my favorite curry dish from my favorite Thai restaurant, the "House Special Curry" from Sweet Basil"If you love peanut sauce," (which I very much do), the menu says, "you must try this red curry peanut sauce with bell pepper, carrots and broccoli".  Well okay!

My 2nd favorite curry story*: One summer I had a terrible terrible cold.  It was so bad I watched Killer Clowns from Outer Space and every single episode of the State in one day.  A friend called to see if I wanted him to bring me curry.

Indeed! 

When he arrived, I was miserably ensconced in a mountain of blankets.  2 pairs of wool socks, 2 pairs of sweatpants, nearly twice the amount of my normal shirt layering, a hoodie, gloves, a scarf, a stocking cap!

All this for a girl who sleeps with the windows open until it's in the 40's, wears flip flops even if it's in the 30's, and finally wears a stocking cap on the two days in Eugene it gets into the 20's.

I started to eat the delicious delicious amazing warm, wonderful delicious curry and I began to feel warm and radiant all over.  The scarf and gloves came off.  Then the hat.  Then the extra pair of pants and socks.

Curry cured my illness!  Or, at least put me on the mend - I felt better every hour that followed.

I am now convinced that the curry is the color of health.

(*My #1 favorite curry story involves drunkenly puking up a large indian dinner in a hotel room in Washington DC at 4am.  Tasted great and the colors were mesmerizing).  

Easy Peanut Red Curry (aka It's So Easy to Make Something Awesome)


Ingredients for the Sauce:
1 15 oz can coconut milk
1 4 oz jar Thai Kitchen Red Curry Paste (I'll keep you posted on other curry pastes - I'm excited to try Thai and True).
4 generous "table" spoons full of your favorite natural peanut butter
2 Tbsp crushed red pepper flakes **you might want to start with less**
at least 1 Tbsp Sriracha hot sauce **you might want to start with less**


Add curry paste to coconut milk in a small saucepan over medium high heat.  Add peanut butter to taste 1 tablespoon at a time, mixing well and waiting a while each time.  Turn to low heat and allow to mature while the rice is cooking, stirring ocassionally, and adding spicy stuff and more peanut butter in small increments. 


But hold on, what's that freaky fractal green vegetable in the middle there?


It is my new obsession: Roman Cauliflower/Romanesco Broccoli.  A member of the beloved-in-the-pacific-northwest brassica family, it is very much like cauliflower - you can cut it into florets and steam it just like cauliflower.  It has the same-ish texture, and a similar but different flavor.  It is very very good.

My research so far leads me to believe that you can use Romanesco as a substitute for broccoli or cauliflower in any recipe.  I am going to test this hypothesis with some Cheesy Romanesco and Roasted Romanesco.

And it's so beautiful!  If you know where to look, fractals are everywhere.  To see them so clearly pronounced in a vegetable makes romanesco quietly profound.  If looking at this vegetable does not excite you, even a little, you must not have a soul.  You don't even need to be stoned to enjoy staring at Romanesco.

Wait, we're supposed to be making curry...
Once you 'get over it' you're ready to cut the veggie into small florets, and chop whatever other veggies you want.
I used 5 small colored carrots, the whole thing of Romanesco, 1/2 yellow pepper and 1/2 orange pepper.
I diced 1/6 of an onion to steam with 1 cup of basmati rice.

If you don't have a combo rice/veggie steamer I'm not sure how you'd cook the rice and steam the veggies.  You're on your own to figure out how to make rice and steam veggies.  This device revolutionized my cooking.  My shortcomings as a cook are beginning to show!


Post-Bliss Ruminations:
This is the 3rd best curry I've ever had.  The first was my "curry cures all illness" curry and the second was a crock-pot curry one of my best friends made for us when we were roommates.

The only good thing (for me) that came out of one of my other best friends moving to Buenos Aires then Sudan then San Fransisco was that she gave me her combo rice/veggie steamer.  Cookware changed my life.

I am so glad I gave making curry a second try.  The first time I made it, it was so bad I almost never made it again.  I stupidly followed the instructions on the bottle of curry paste to add ONE TEASPOON of curry paste.  Puh-leeze!  Are you trying to kill us with blandness?!

If a curry isn't so hot that it clears your sinuses, it's not worth eating.


Sunday, October 23, 2011

Roasted Red Pepper Hummus

Basic Hummus:
Ingredients:
1 16 oz can garbanzo beans
1/2 cup liquid from the can
3-5 Tbsp lemon juice
1/3 cup tahini
1-2 Tbsp olive oil


Puree in blender (or food processor) until smooth as you like it.  Add more bean liquid, lemon juice or oil to thin it, or add more garbanzos or tahini to thicken it.


Since I don't cook with garlic, I add:
~1/2 can black olives 
sliced jalepenos, to taste (I use at least 10 slices)


If you add just enough olive and just enough jalepeno, you end up with a wonderful non-flavored hummus with just the right amount of bite and full flavor.

For roasted red pepper hummus, I added 1 heaping teaspoon of crushed red pepper flakes and 1 generous tablespoon of Sriracha hot sauce.


Plain hummus is very adaptable - you can add whatever you'd like!  Perhaps surplus salad greens like spinach and kale?

Roasted Red Peppers
Put some red peppers on a tray.  Remove the stems.  You can leave them whole, or cut them in half and seed them first if you want.  Preheat the oven to at least 400 degrees, then turn on the broiler.

Broil on one side until the skin is black and bubbly.

Using a pair of tongs, flip over the peppers.  Broil until skin is black and bubbly.

When they are done, place them in a paper bag and close the bag.  Let sit for a few minutes. This traps the heat making the skin easier to peel off. 

If you left the peppers whole, cut out top first to get as many seeds out with one motion as possible.  Then you can squeeze the pepper from the bottom up like a tube of toothpaste to get most of the seeds out.

After I seeded and peeled the peppers, I pureed them in my tiny food processor and added them to the basic hummus recipe (above).


Spicy Spinach and Olive Hummus

Basic Hummus:
Ingredients:
1 16 oz can garbanzo beans
1/2 cup liquid from the can
3-5 Tbsp lemon juice
1/3 cup tahini
1-2 Tbsp olive oil

Puree in blender (or food processor) until smooth as you like it.  Add more bean liquid, lemon juice or oil to thin it, or add more garbanzos or tahini to thicken it.

Since I don't cook with garlic, I add:
~1/2 can black olives 
sliced jalepenos, to taste (I use at least 10 slices)

If you add just enough olive and just enough jalepeno, you end up with a wonderful non-flavored hummus with just the right amount of bite and full flavor.

Then you can add stuff!  Like fresh roasted red pepper puree!!!

For this spinach hummus, I filled my tiny food processor with fresh cilantro, parsley and kale, then again with spinach.  Mix well.

Eat with pita bread, your favorite crackers, on a sandwich, or with bread sticks.


If your garden ever gives you more greens than you can handle, this is a great way to sneak them in to your food!


Saturday, October 22, 2011

Megan's Signature Vegan Whole Wheat Hazelnut Dark Chocolate Chip Oatmeal Cookies

This is THE oatmeal cookie recipe. 

I found this gem in the first cookbook I ever purchased, New Farm Vegetarian Cookbook.  Back in my days of yore.  Me and these cookies go waaaaay back.  Before I learned to cook.  This was the first recipe I was ever great at, my sometimes only source of pride and confidence during many years of uncertainty.

These cookies have been mailed across the country, given as gifts, taken to potlucks, been frozen in 'bulk', been eaten for breakfast, lunch, dinner, dessert and anything in between, been camping, provided travel food for road trips and cross-country flights, been taken to work for ingratiation, followed several Thanksgiving dinners, been baked just to cheer me up, served as a Victory Cookie when I was already happy...probably more. 

These cookies make at least one person you share them with glow visibly with pleasure.  You can almost see exclamation points in their eyes.  These cookies will make you popular and loved.  These cookies will be a comfort to you when nothing else will.  These cookies....these cookies....these are my faaaaaavorite cookies. 

First I will give you my personalized adaptation of this recipe, with comments about variations.  And I'll include the original recipe as well, since that's where it all began.

Megan's Signature Whole Wheat Dark Chocolate Hazelnut Oatmeal Cookies

Ingredients:
1 cup really good butter or your favorite margarine (mine is Earth Balance Buttery Sticks), softened, and room temperature or warm if your room is cold
2/3 cup safflower or sunflower oil (for food-activism reasons, I never use soybean or canola oil)
2 cups light brown sugar, packed
2 cups demerara sugar (like white sugar, but not as processed/white/refined)
1 cup hemp milk (hemp milk is my favorite vegan milk - thick, creamy, non-GMO. Or organic soymilk. Or even just water)
4 tsp vanilla

1 cup all-purpose flour
4 cups whole wheat pastry flour
2 tsp baking powder
2 tsp baking soda
1 tsp salt
at least 1 Tbsp cinnamon 
a dash of ground cloves
at least 5 cups rolled oats (more or less as it suits you)
dark chocolate chips (add some, mix well and see if you want to add more)
coarsely chopped hazelnuts (add some, mix well and see if you want to add more)

Instructions
Prep:
1. Preheat oven to 350.
2. Begin to soften the butter/Earth Balance the best way you know how.  I will not tell you how I soften butter.
3. Measure flour, baking powder, baking soda, salt and spices into a medium sized mixing bowl.  Mix well and set aside.
4. In a small bowl, measure the cups of brown sugar into the bowl keeping the shape of the measuring cup.  Pour the 'white' sugar over the brown sugar.  Set aside.

Mixing:
1. In a large mixing bowl, cream butter/Earth Balance sticks and oil together BY HAND.  I like to use my bamboo rice spoon to help break up any less than warm chunks of butter by slowly smashing them against the sides of the bowl.  Mix very very well.
2. Grab the bowl of sugar and combine the sugars with your fingers.  (That's my favorite part).
2.5 Cream the butter/oil mix with the sugars, combining until the mix is uniform, smooth and sandy.
3. Add hemp milk and vanilla and mix BY HAND until smooth.


4. Add the dry ingredients in 3 batches, mixing as you go.
5. Add oats and mix well.
6. At this point, you might need to add more hemp milk. The dough should be just on the verge of being a little too wet.


6. Add as much chocolate chips and hazelnuts as you want and some bad grammar too.

Baking:
1. Eat some cookie dough! (No eggs, no worries!).
2. Portion onto an ungreased cookie sheet in heaping "table"spoons full (not a measuring tablespoon, but like a spoon you'd eat with).
3. Bake at 350 for 11, 12, or 13 minutes (depending on your oven).  They should be puffy and a little uncooked on top, and the bottoms should be JUST beginning to turn brown.  For these cookies, it is better to err on the side of them being under-done.  Never, ever, ever over-bake these cookies.
4. I like to bake one cookie sheet at a time, because I once had an oven that didn't circulate heat properly and I ruined a batch and cried for a long time and no matter what oven I'm using I still never bake more than one sheet at a time.  This makes making these cookies a long ordeal.  In between batches, you'll have plenty of time to play with your cat,
5. EAT LOTS MORE COOKIE DOUGH,
do the dishes, etc.
6. Cool on the cookie sheet for a couple minutes, then transfer to a cooling rack.
7. EAT LOTS OF COOKIES. Remember to save some for whatever you're baking them for.


The original from the New Farm Vegetarian Cookbook:

Ingredients:
1/2 cup margarine
1/3 cup oil
1 cup brown sugar, packed
1 cup white sugar
1/3 cup soymilk
2 tsp vanilla
2 1/2 cups flour
1 tsp baking powder
1 tsp baking soda
1 tsp salt
3 cups rolled oats
1/2 cups raisins (opt)


Original Directions:
Cream margarine and oil together, then cream in the sugars. Add soymilk and vanilla.  Beat until smooth.  Beat in flour, baking powder, baking soda and salt. Mix, add oats and raisins and blend well.  Bake at 350 for just about 15 minutes or until the undersides just start turning brown.


"In Joy!"

Thursday, October 20, 2011

Carrot Pita Pizza Quesedillas

I haven't cooked anything since last Thursday when I made Spanish Rice Casserole because 1. there was so much of it that's pretty much what I had to eat for lunch and dinner for 5 days in a row, 2. since I had a major flu last week I was behind on errands and I spent my one day off this weekend doing four loads laundry instead of the mountain of dishes and in order to cook anything and take pictures for the blog, I would have had to have done all the dishes first and I was too tired to do them, and 3. Mojo ate half a Tylenol on Tuesday night and went to the emergency vet so I was up late crying on Tuesday, exhausted on Wednesday, and he is back at home Occupying my lap tonight so I can't get up.

But I'm getting tired of only having the posts I have currently posted, so here's a retroactive post from something I made this summer with the beautiful and delicious orange and yellow carrots I grew in my garden...


Carrot Pita Pizza Quesedillas!


You can make Pita Pizzas with any toppings you'd like.  My imperative was creative uses for my delicious beautiful carrots.  And I only made it into a quesedilla because it made the whole thing so much more fun to say. 

Ingredients (for one serving):
One pita, torn in half (carefully) (I used a thin whole wheat variety but the puffy white variety might be very yummy for this too)
Pasta sauce (I probably used Sockarooni)
Mozzarella Cheese
Shredded Carrots
Fresh tomatoes (diced)


Directions:
1. Spread pasta sauce on the 2 pita halves.
2. Cover with a little bit of mozzarella.
3. Cover with a generous portion of shredded carrots.
4. Cover with a little more mozzarella.

5. Bake in the oven (350 probably) for a little while until the cheese is melty (you can broil it a little too).
6. Put the 2 halves together topping sides together to make the "quesedilla"


Mine had a whole in it because I got impatient while I was tearing apart the pita halves.


Post-Bliss Ruminations:
I will grow carrots every year for the rest of my life just so I can make these pita pizzas again and again and again and again.  Store-bought carrots are probably not worth it for this meal - they need to be fresh and bursting with flavor, otherwise this meal might be a little gross, or just kind of bland.  Ones from a Farmers Market might do it, but really the best ones are the ones from your garden!  I never knew carrots could taste so good!

I love to use shredded carrots in my cooking because it adds color, and the carrots get soft and unobtrusive and blend in easily with the other flavors, and I'd like to think it adds extra nutrients.

Bonus Pictures:
Mojo will eat a lot of things that a lot of cats don't eat, like blankets, plastic bags, tee-shirts, spiders, moths, wasps, and towels, but he also loves food.  Pizza seems to be his favorite, but he will eat broccoli if it has dressing on it, and lettuce.  I found out about his lettuce-eating the same way I found out about all his pica-esque habits - by accident.  I tore the hard lettuce spines away from the leaves, and tossed them in the sink.  Turn away for a few minutes and hear the strangest sound in the world.  Mojo's in the sink crunching on lettuce.  Of all the things he eats, this is the funniest.

Given his proclivities, I'm surprised that I was surprised when he also seemed to like carrots:

Thursday, October 13, 2011

Spanish Rice Casserole (or just Spanish Rice) (and maybe Epic Burritos too!)

Spanish Rice was one of the first things I learned to cook.  Back in my days of yore, circa 2007-ish.  I don't even remember where I got this recipe originally.  Like I said, yore.

I followed the recipe to the letter, it worked PERFECTLY.  I was very proud of myself, and very very surprised since most of the things I had tried to cook before turned out so horrible I'd take one bite, realize that it wasn't even good enough to even be considered mediocre, start sobbing (I'm not joking), throw the whole thing away, and give up cooking for 6 months or more. I took failure pretty hard back then.

Nowadays I still cry when something I make doesn't turn out well, but I recover more quickly, and I never give up cooking for more than 5 days...although 4 years later I remain so traumatized by my awful lasagna that I have yet to try making it a second time.

The basic recipe:
Spanish Rice
Ingredients:
1 cup rice (this recipe called for white rice)
2 1/2 cups water
2 Tbsp oil
1 8oz can tomato sauce
1 bell pepper (chopped) 
3/4 tsp chili powder

Directions: 
1. Cook and stir rice in oil until golden brown.
2. Add bell pepper, tomato sauce and water.
3. Heat to boil, reduce heat and simmer for 30 minutes, stirring occasionally.

Sounds easy, right?  IT IS!

And because I'm me, here's how I like to make it complicated and awesomer:

Spanish Rice Extended Version
Core Ingredients:
 
1 cup brown rice
2 1/2 cups water (although, I think this needs to be more like 3 because I always end up adding more)
Some oil (I use safflower)
1 8 oz can tomato sauce
1 bell pepper


Stuff I Add:
More bell pepper, up to 2 and 1/2.  I love to use red, orange and yellow. ("Eat a rainbow every day")
1 can diced tomatoes, with juice
Cumin seeds
Cumin
Chili powder if you have it
~3/4 cup diced onion
1 or 2 stalks of celery (optional)
A little bit of diced jalepeno (optional)

Directions:
1. Heat oil with cumin seeds and cumin in a large pan until warm.  Add dry rice and cook, stirring occasionally, until golden brown. This makes your house smell wonderful, gives the rice more flavor, and gives you time to chop the veggies.

2. Add celery (if you choose), onion and jalepeno (if you choose).  Saute some more.  (Remember: jalepeno/jalepeno steam + eyes = pain.)


3. Add bell pepper, tomato sauce, tomatoes and water.  Bring to a boil.

4. Cover and simmer until it's done, stirring occasionally.  (At least 30 minutes....probably more.)


This is pretty darn good.  But then one day I needed to make One Big Inexpensive Nourishing Meal that Would Make Enough Leftovers to Last Until Payday.  That's when I invented...


Spanish Rice Casserole
Ingredients:

Spanish Rice (as above - as simple or complicated as you want to make it)
Cans of beans (I usually use 3: 1 can kidney, 1 can pinto, and 1 can black)
A small mountain of shredded cheddar cheese
1 or 2 shredded carrots (optional) 
Corn (optional - after my experience this evening with canned corn, I am hereby going to be snobby about corn.  Canned corn is complete bullshit.  In the future, I'll stock my freezer with fresh corn from a local farm or friend's garden.  Repeat: canned corn is complete bullshit. It's just not worth it).

Directions:
1. Preheat the oven to 350.  While the Spanish Rice is simmering, drain the beans, shred the cheese, then shred the carrots.  (Kitchen Sanity Tip #1: shredding the carrots after the cheese helps clean the cheese off the shredder.) (Kitchen Sanity Tip #2: shred a block of cheese randomly some day when you have time, then put it in a container in the fridge. Saves time in the future! I don't like to buy pre-shredded cheese because it's kind of a waste of money).

2. Lay out the beans in a large casserole dish.  Mix in carrots and corn, if you choose.  Mix in some of the cheese.


3. When Spanish Rice is done, mix well with the beans, cheese and carrots.  Put more cheese on top.  Put in the oven for a little while, until you think the beans are as warm as the rice and the cheese is melty.

You can stop here and eat it (I love it with sour cream!).  It's pretty much a complete meal - calcium, protein, fiber, iron, and more!

Or you could follow the Megan Path even further and make...

Epic Burritos
Ingredients:

Tortillas
A few heaping scoops of piping hot Spanish Rice Casserole per tortilla
Sour cream
More shredded cheese
Avocado
Sriracha (or your other favorite hot sauce)
Jalepenos (especially if you like spicy stuff and didn't add any to the rice originally)


Line the tortilla with sour cream. Chop avocado into little bits and smear onto tortilla.  Dot generously with Sriracha.  Add Spanish Rice.  Wrap.  ENJOY!

How to Fold a Burrito

I thought I knew how to roll a burrito, I mean, how hard is it?  It's about as intuitive as learning to crawl - it just happens. It's not that hard. The force of 1000's of years of evolution is working in your favor - secretly urging you from a deep hidden place in your psyche, moving you to make the right motions.

Yet, every burrito I had ever rolled, however delicious, invariably ended with tortilla mutiny.

Then I worked in the kitchen for the Holy Cow Cafe, where pre-packaged, travel-stable burritos are a major portion of their business.  It was there in the industrial kitchen add-on to their eccentric home where I learned the secret of a well-built burrito. Rectangle in the center, and the little tuck.

Someday, I'll add a finer picture tutorial, but in short, here's how to fold a decently destruction-resistant burrito:

1. Place all the burrito fixings in a rectangle in the middle of the burrito, getting close to the edges along the short side of the rectangle, and leaving ~1/3 of the tortilla on each side of the long edge of the rectangle.  If you have small, flat ingredients like (sour cream, cheese, smashed avocado), those can extend farther - but all the big bulky stuff should be piled up in the middle.

Align your plate so that the short sides are left and right.

2. Fold in the short sides ("right and left")


3. Take the 'bottom' flap and take it to the top - fold it over over the mound of goodness.  Once you reach the edge of the ingredients, tuck the edge of the tortilla underneath a little, like you're wrapping a bambina into swaddling clothes. (Maybe, I don't really know what that's like. Nor do I ever want to know).


<--  Tuck it in!


4. Continue rolling in the same direction, essentially flipping over whole ordeal.  Now the "top" flap is resting underneath the rest of the folds.


For best results, eat it!

Wednesday, October 5, 2011

Chili

I feel kind of silly posting about chili, because I recently learned that making chili can be as easy as dumping a bunch of stuff in a pot and letting it cook for a while.

Chili has been on my bucket list for a while, but it seemed a recipe too shrouded in mystery to make.  Every recipe I found online was different - portions, ratios, ingredients.  I felt lost.

Then, a coworker at the bakery made chili for our Soup of the Day.  I looked at the final result.  I looked at the list of ingredients she'd left for us.  Then it hit me "Whoa, I think I can just throw a bunch of stuff together, seasoned to taste, and it will probably turn out edible."  Now that's my kind of "recipe"!

Ingredients:
Cans of beans (I used 2 kidney, 2 black, 1 pinto, and 1 can of corn, 1 can diced tomatoes, and 1/2 can tomato sauce)      

Veggies (I used carrots, onions, celery, and bell pepper)
 
Spices (I used the Mystery Red Powder which was either cayenne or chili powder. Also, cumin, cumin seeds, and red pepper flakes)


Directions:
1. Heat some oil in a saute pan (I use safflower oil because it has a high smoking temperature).  Mix in spices and heat for a while.  Add veggies, stirring occasionally, heat until softened.

1.5. Meanwhile, stir the canned ingredients into a large pot, and add some extra seasonings.  Let it stew, stirring occasionally - do not let the bottom of the chili burn.  I learned from my roommate that slow cooking the beans and stuff draws out more liquid.  I grew up with very soupy chili's, so I erred on the side of a very liquidy/tomatoey chili because that's how I like it.


2. After the veggies are softened, add to pot.  Cover and let sit on low-ish heat for a while (maybe 20-40 minutes, or about as long as it takes to do the mountain of dishes that appears every time you turn your back).

Optional Ingredients:
A Scarface proportioned mountain of cheddar cheese
Fries!

Saturday, October 1, 2011

Spaghetti Frittata Scramble

This was just supposed to be Spaghetti Frittata, but a few last-minute corrections to brain dead mishaps led to the creation of a scramble - which turned out just as delectable, if not more so, as the non-mishap version.


Yes, I realize this is the third night in a row I've eaten some variation of carbs with cheese and tomato sauce. No, that's not what this blog is all about, I've just been really in the mood for that unique comfort brought only by some kind of warm pasta/carby cheesy meal.

One day a few months ago, I had drastically over-estimated the amount of pasta I would need for 4 servings of spaghetti.  The next day, I googled "leftover spaghetti" to see if there were any interesting things I could make besides my usual Spaghetti Sandwich.

Spaghetti Frittata was at the top of the list, and most of the search results were Frittata-related.  (There was also one recipe for a Spaghetti Pancake and one for Fried Spaghetti which are currently on my bucket-list).

After looking at a half dozen recipes, I used the ones from Honest Fare and Slash/Food to create my recipe guidelines.

What I like about recipes like this is they are perfectly adaptable to different tastes and different on-hand ingredients.  "Leftovers" was the theme for this frittata, wherein I used up the remaining zucchini from Thursday's Lasagna Cupcakes, the rest of the Miscellaneous Cheese Mixture from the time I made Cacio e Pepe, a green pepper that needed to be used, and some carrot and onion.


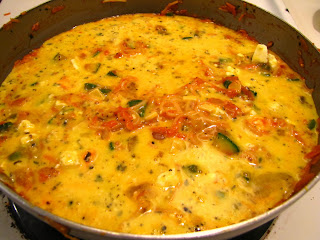
First, I mixed the noodles with Sockorooni so it would have time to soak in while I made preparations.  I didn't measure it, but it was at least 4 cups of prepared pasta. I sprinkled in 1/3 of the remaining Miscellaneous Cheese Mixture into the pasta.  Then, I sauteed the veggies in safflower oil until the bits of zucchini were soft. While the veggies were sauteing, I whisked 5 eggs with some half and half, and added another 1/3 of the Cheese Mixture.  I mixed the veggies and the pasta together really well, then poured the egg all over the mixture.  Finished it off with the very last of the Miscellaneous Cheese Mixture.


I should have just left it alone here. I am used to the things I cook having a short cooking time, or maybe I was just too impatient.  I didn't want the bottom to burn, and I had put in perhaps too much spaghetti, or not quite enough eggs.  So I scrambled it to distribute the eggs so they wouldn't be underdone and give me food poisoning and ruin my big day tomorrow.


After scrambling the whole ordeal, I continued to cook it on the stovetop, and also put it under the broiler for a good few minutes.


Final Thoughts:
This was reeeeeally yummy and fun to eat.

A great breakfast for tomorrow morning before a 10-hour work day at Taste of the Valley.

One unintended but completely awesome outcome of this 'Scramble' is the way the egg blended with the pasta sauce and cheese to create a flavorful, ricotta-like component.  The effect was wonderful!

I will have to try to make an actual Spaghetti Frittata for this blog, but for non-blogging meals in the future, I might stick with cooking it as a scramble because this turned out so good!

Bonus Picture: Tormenting Mojo (he's mid meow)